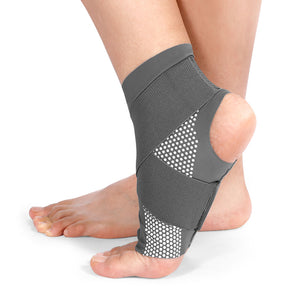
Large Ankle Brace
- Black
- Orange
- Green
- Pink
- Black
- Red
- Blue
- Orange
- Black
- Grey
- Blue
- Pink
- Purple
How Do I Know My Ankle Support Size?
Choosing the right size for ankle support is crucial for both your daily comfort and the overall effectiveness of the compression. A properly fitted ankle sleeve or wrap provides essential joint stability, drastically reduces swelling, and accelerates healing after a sports injury or a minor tweak. Whether you are a competitive athlete, a weekend warrior hitting the basketball court, or someone recovering from a painful sprain, finding the correct sizing ensures that your protective gear functions exactly as intended without causing further irritation.
Why Finding the Correct Ankle Support Size Matters
Wearing supportive athletic gear that doesn't fit properly can do more harm than good. If your support is too loose, you will miss out on the targeted compression needed to stabilize ligaments and improve blood circulation. On the other hand, if it is excessively tight, it can restrict healthy blood flow, cause skin chafing, and increase foot numbness. A precisely measured fit provides optimal structural reinforcement, allowing you to walk, run, and exercise with absolute confidence.
Step-by-Step Guide: How to Measure Your Ankle
To determine your ideal fit, you will need to take a few quick measurements at home. Using a flexible measuring tape is the most accurate way to get the right measurements. Follow these simple steps:
1. Locate the Measuring Point
Sit down and place your foot flat on the floor. Identify the narrowest part of your lower leg, which is located just above the prominent bony protrusions on either side of your ankle (the medial and lateral malleoli).
2. Take the Ankle Circumference
Wrap the flexible measuring tape entirely around this narrow section. Make sure the tape sits snugly against your skin, but do not pull it so tight that it pinches or creates deep indentations. Record this exact measurement. For most users, it is easiest to record this number in inches, but noting the centimeters can also be helpful for quick reference.
3. Measure Your Arch and Note Your Shoe Size
Some sizing guides go beyond simple ankle circumference. It is highly recommended to also measure the circumference of your foot arch—wrapping the tape right around the center of your foot. Additionally, write down your standard US shoe size. Having these three metrics (ankle circumference, arch circumference, and shoe size) will guarantee you are prepared for any sizing chart you encounter.
Navigating Size Charts: What to Do If You Are Between Sizes
Once you have your measurements ready, it is time to cross-reference them with the specific sizing chart provided by the gear's creator. Every brand uses slightly different sizing algorithms, so you should never assume you are a "Medium" across the board.
Once you have selected the perfect ankle support brace for your daily needs, carefully match your measurements to the chart. Sizing typically ranges from small to large, with medium and extra-large as standard options.
But what if your measurements fall exactly between two sizes?
Your final decision should depend on your specific recovery needs and comfort preferences:
- Size Down for Compression: If you are dealing with acute swelling, recovering from a fresh sprain, or need highly rigid stability for high-impact sports, choosing the smaller size will provide a tighter, more compressive hold.
- Size Up for Comfort: If you have sensitive skin, plan to wear the sleeve all day long, or simply prefer a more relaxed fit for improved walking mobility, opting for the larger size is the best route.
Finding the Right Fit for Wider Ankles
Not all lower legs are shaped the same, and severe injuries often bring significant swelling that standard sizes simply cannot accommodate. For individuals with broader lower legs or those dealing with severe post-injury inflammation, opting for an extra-large ankle brace is an incredibly smart choice.
These generously sized options do more than just accommodate wider circumferences; they typically feature enhanced structural layouts. You will often find integrated metal stays, advanced reinforced strapping systems, and wider bands that distribute pressure evenly. These features provide maximum coverage and limit dangerous side-to-side motion, protecting you from accidental re-injury while maintaining premium comfort.
Testing Your Fit: Comfort and Mobility Checklist
If you have the opportunity to try the gear on before committing, always take a quick test walk. Once you pull the support on, run through this quick checklist:
- Circulation Check: Your toes should remain warm and retain their normal color. If your toes tingle, feel cold, or turn pale, the fit is much too tight.
- Mobility Check: You should be able to wiggle your toes effortlessly and have an acceptable range of motion in your foot, all while feeling fully secure around the heel and joint.
- Skin Contact Check: Pay close attention to any seams, straps, or laces. There should be no pinching, scratching, or intense friction, as these minor annoyances can quickly turn into painful blisters during prolonged wear.
- Footwear Check: Always try the wrap on with the actual shoes you plan to wear. Some thicker designs might require you to loosen your shoelaces or wear a slightly looser athletic shoe to accommodate the extra bulk.
Knowing your exact measurements is the foundational step for effective healing and long-term injury prevention. By measuring accurately, referencing specific size charts, and honestly evaluating how the gear feels in motion, you can make a well-informed and confident decision. The perfect fit makes all the difference in your athletic recovery journey, helping you easily regain mobility, reduce joint pain, and step back into your active lifestyle with confidence.